RHCSA - Redhat Certified System Administrator
The Red Hat Certified System Administrator (RHCSA) is a certification offered by Red Hat, Inc that validates an individual's knowledge and skills in managing and administering Red Hat Enterprise…
The Red Hat Certified System Administrator (RHCSA) is a certification offered by Red Hat, Inc that validates an individual's knowledge and skills in managing and administering Red Hat Enterprise…
The Red Hat Certified System Administrator (RHCSA) is a certification offered by Red Hat, Inc that validates an individual's knowledge and skills in managing and administering Red Hat Enterprise Linux systems. It covers essential tasks like system installation, user and group management, file system configuration, networking, containers and security. The certification is earned through a practical, hands-on exam that tests real-world skills and problem-solving abilities.
To reset the root password a few steps needs to be done.
e when the GRUB menu appears.init=/bin/sh at the end of it and press CTRL X.mount -o remount rw /.passwd root..autorelabel file, touch /.autorelabel./usr/sbin/reboot -f.⚠️ Note: For examples always tend to view the man of the command then type / and write example. If available, you'll be given some examples that will help you.
man [command] – Display the manual for a commandls – List directory contentscd [path] – Change directorypwd – Print working directorycp [from] [to] – Copy files and directoriesmv [from] [to] – Move or rename files and directoriesrm [-rf] [file/directory] – Remove files or directoriestouch [file_name] – Create an empty file or update the timestamp of a filemkdir [directory_name] – Create directoriesrmdir [directory_name] – Remove empty directoriesfind [path] [options] [expression] – Search for files in a directory hierarchylocate [file_name] – Find files by namegrep [pattern] [file] – Search text using patternsless [file] – View file contents interactivelyhead [file] – Output the first part of filestail [file] – Output the last part of fileswc [file] – Count words, lines, and characterschmod [permissions] [file] – Change file modes or Access Control Listschown [owner]:[group] [file] – Change file owner and groupdf [options] – Report disk space usagedu [options] [path] – Estimate file space usageps [options] – Report a snapshot of current processestop – Display Linux taskskill [pid] – Send a signal to terminate processesuname [options] – Print system informationdate [options] – Display or set the system date and timehistory – Show the command history#!/bin/bash – Shebang line to specify the script interpreterecho [text] – Display a line of text or variablesif [condition]; then ... fi – Conditional statementfor [variable] in [list]; do ... done – Loop through a list of itemswhile [condition]; do ... done – Loop while a condition is truecase [variable] in ... esac – Multi-way branch statementexport [variable=value] – Set environment variablesgrep [pattern] [file] – Search text using patternsawk '[pattern] {action}' [file] – Pattern scanning and processing languagesed '[command]' [file] – Stream editor for filtering and transforming text/etc/shadow – Stores user passwords and account expiration information/etc/passwd – Contains user account information/etc/group – Defines group memberships and attributes~/.bash_profile and ~/.bashrc – Customizes user-specific environment and shell settings/etc/skel – Provides default files and directories for new users/etc/sudoers – Configures sudo permissions and rules/etc/default/useradd – Sets default values for useradd command/etc/security/pwquality.conf – Configures password complexity requirements/etc/login.defs – Defines parameters for user creation/var/log/messages – Contains system and application log messagesuseradd [options] [username] – Create a new userusermod [options] [username] – Modify a user accountuserdel [username] – Delete a user accountpasswd [username] – Change a user's passwordgroupadd [groupname] – Create a new groupgroupmod [options] [groupname] – Modify a groupgroupdel [groupname] – Delete a groupgpasswd -a [username] [groupname] – Add a user to a groupid [username] – Display user and group informationgroups [username] – List groups a user is a member of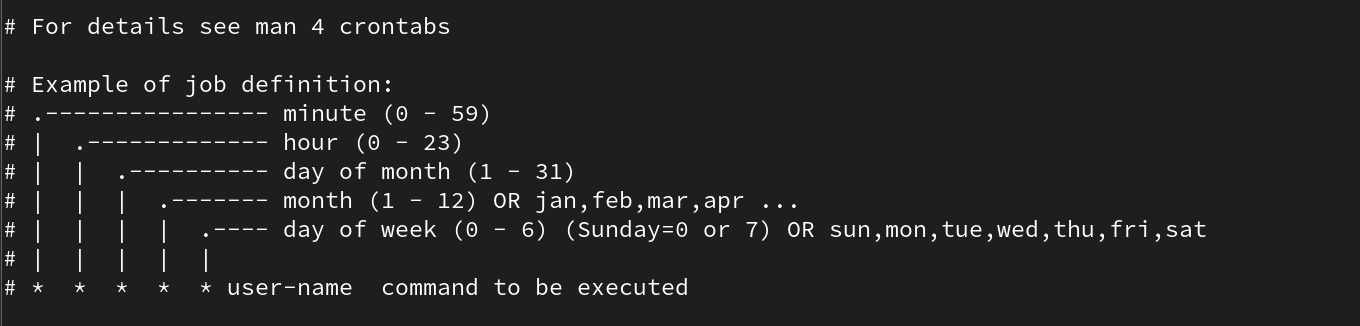
/etc/crontab – Manages scheduled tasks and cron jobsDo not edit the
/etc/crontabfile directly. Instead, use the commands below.
crontab -e – Edit the crontab for the currently logged-in usercrontab -e -u [username] – Edit the crontab for a specific user@hourly – Every hour@daily – Every day@weekly – Every week@monthly – Every month@annually – Every year@reboot – Every rebootx,y – At times x and yx-y – From x to yx-y/z – From x to y with a step of z* – Every unit*/z – Every z units@daily /path/to/script.sh – Run a script every day at midnight*/5 * * * * /path/to/command – Run a command every 5 minutes0 3 * * 1 /path/to/weekly-job.sh – Run a job every Monday at 3 AMThis section will cover 3 services
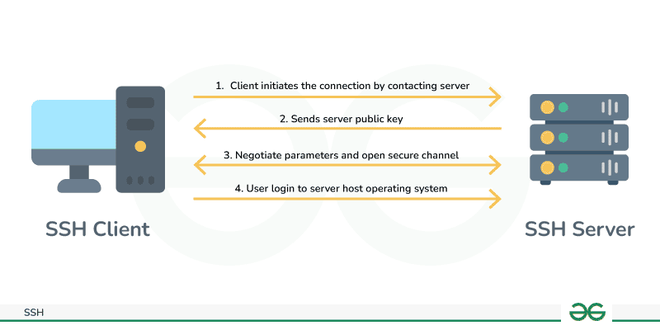
/etc/ssh/sshd_config – Configures SSH server settingsSetting up SSH :
firewall-cmd --add-port=22/tcp --permanent - Adding the port to the firewallfirewall-cmd --reloadfirewall-cmd --list-portssystemctl enable --now sshdConnecting without password :
ssh-keygen [-t rsa]ssh-copy-id client@ip - Create the authorized_keys in the client .ssh folder.ssh client@ip - Connects to the client.Changing ssh port :
nano /etc/ssh/sshd_config - Modify PORT [number]semanage port -a -t ssh_port_t -p tcp 2222 (you can find the whole command in the man).firewall-cmd --add-port=2222/tcp --permanentfirewall-cmd --reloadsystemctl restart sshd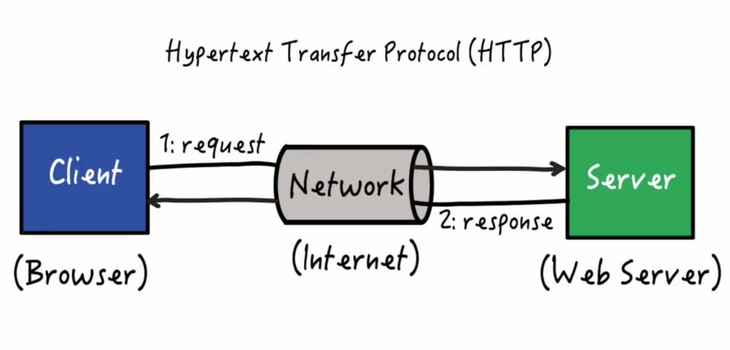
/etc/httpd/conf/httpd.conf – Configures HTTPD server settingsSetting up HTTP (HTTPD service) :
dnf install httpd – Install the HTTPD server software.
firewall-cmd --permanent --add-service=http – Open port 80 for HTTP connections in the firewall.
firewall-cmd --permanent --add-service=https – Open port 443 for HTTPS connections in the firewall.
firewall-cmd --reload – Apply the firewall changes.
systemctl enable --now httpd - Enables the HTTPD service.
Changing HTTPD port :
vim /etc/httpd/conf/httpd.conf – Edit the HTTPD configuration file to change the port.Listen [number] to the new port number.semanage port -a -t http_port_t -p tcp 81 – Add the new port (81) to SELinux configuration.firewall-cmd --add-port=81/tcp --permanent – Open the new port (81) in the firewall.firewall-cmd --reload – Apply the firewall changes for the new port.systemctl restart httpd – Restart the HTTPD service to apply the new port settings.Changing default http directory :
vim /etc/httpd/conf/httpd.conf – Edit the HTTPD configuration file to change the default directory.DocumentRoot and change the path to the new directory.<Directory "/../../"> ... </Directory> and update the path.man semanage fcontext – View the manual for managing SELinux file contexts.semanage fcontext -a -t httpd_sys_content_t "/new/path(/.*)?" – Add a new file context for the new directory.restorecon -R -v /new/path/ – Apply the new SELinux context to the directory.systemctl restart httpd – Restart the HTTPD service to apply the changes.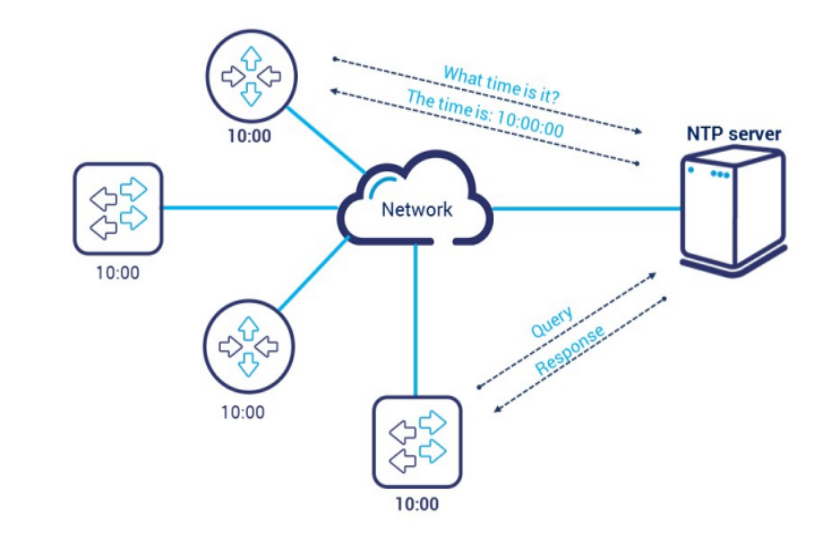
/etc/chrony.conf – Configures Chronyd Settings.Server Side :
dnf install chrony – Install the Chrony NTP server.systemctl enable chronyd – Enable the Chrony service to start on boot.systemctl start chronyd – Start the Chrony service.vim /etc/chrony.conf – Edit the Chrony configuration file to allow client access.allow @ipclient to permit the specified client IP.systemctl restart chronyd – Restart the Chrony service to apply the changes.firewall-cmd --add-service=ntp --permanent – Allow NTP service through the firewall.firewall-cmd --reload – Reload the firewall to apply the changes.Client Side :
dnf install chrony – Install the Chrony client.systemctl enable chronyd – Enable the Chrony service to start on boot.systemctl start chronyd – Start the Chrony service.vim /etc/chrony.conf – Edit the Chrony configuration file to specify the NTP server.server @ipserver iburst to set the NTP server.systemctl restart chronyd – Restart the Chrony service to apply the changes.chronyc sources -c – Verify the NTP sources and synchronization status.Setting an NTP Time Zone:
timedatectl list-timezones – List available timezones.timedatectl set-timezone <zone> – Set the system timezone.timedatectl – Verify the current date, time, and timezone settings.tar -cvf archive.tar folder/ – Create (c) an archive file (f) named archive.tar from the folder/ directory with verbose output (v).
tar -tvf archive.tar – List the contents of archive.tar.
gzip archive.tar – Compress archive.tar using gzip.
gzip -d archive.tar.gz – Uncompress the archive.tar.gz file.
bzip2 archive.tar – Compress archive.tar using bzip2.
bzip2 -d archive.tar.gz – Uncompress the archive.tar.gz file.
tar -cv(z/j)f archive.tar.gz folder/ – Create and compress an archive in one step. Use z for gzip and j for bzip2.dnf install nfs* – Install NFS server packages.systemctl enable --now nfs-server – Enable and start the NFS server.mkdir sharedFolder – Create a directory to share.echo "/sharedFolder @ipclient(x ,y)" >> /etc/exports – Add the directory to the NFS exports list with options x (ro/rw) and y (no_root_squash/async).systemctl restart nfs-server – Restart the NFS server to apply changes.Options:
no_root_squash – The superuser on the client retains full privileges on shared files.root_squash – (default) Limits the client's superuser privileges on shared files.rw – The shared directory will be readable and writable for the client.ro – The shared directory will be read-only for the client.sync – (default) Synchronous connection; the server waits for data to be physically written to the disk before responding to the client's write request.async – Asynchronous connection; the server can respond to the client before the data is physically written to the disk.Permissions:
semanage boolean -l | grep nfs_export – Verify that NFS is allowed to export with the two modes.setsebool -P nfs_export_all_rw=1 / setsebool -P nfs_export_all_ro=1 – Set SELinux booleans for read-write or read-only export.firewall-cmd --list-all – List all current firewall rules.firewall-cmd --add-service=nfs --permanent – Add NFS service to the firewall.firewall-cmd --reload – Reload the firewall to apply changes.exportfs -avr – Export the shared directories.dnf install nfs-utils – Install NFS client utilities.mkdir /mount_point – Create a directory to mount the NFS share.mount -t nfs -o rw @ipserver:/shared_directory /mount_point – Mount the NFS share temporarily with read-write permissions.echo "@ipserver:/shared_directory /mount_point nfs _netdev 0 0" >> /etc/fstab – Add a permanent mount entry in /etc/fstab.mount -a – Mount all filesystems mentioned in /etc/fstab.df -h – Check the mounted filesystems.The user created should have the same UID in both the server and the client side.
dnf install nfs* – Install NFS server packages.systemctl enable --now nfs-server – Enable and start the NFS server.useradd -u 2222 -b /server user20 – Add a user with UID 2222 and base directory /server.echo "/server *(rw,no_root_squash)" >> /etc/exports – Add the directory to NFS exports list with read-write permissions and no root squash.firewall-cmd --add-service={rpc-bind,mountd,nfs} --permanent – Add necessary NFS services to the firewall.firewall-cmd --reload – Reload the firewall to apply changes.systemctl restart nfs-server – Restart the NFS server to apply changes.exportfs -arv – Export the shared directories.dnf install nfs-utils – Install NFS client utilities.dnf install autofs – Install AutoFS for automatic mounting.useradd -M -u 2222 -d /client/user20 user20 – Add a user with UID 2222 and home directory /client/user20.echo "/client /etc/auto.user20" >> /etc/auto.master – Add the AutoFS map to the master configuration file.echo "user20 -rw 192.168.0.24:/server/user20" >> /etc/auto.user20 – Create the AutoFS map for the user.systemctl restart autofs – Restart the AutoFS service to apply changes.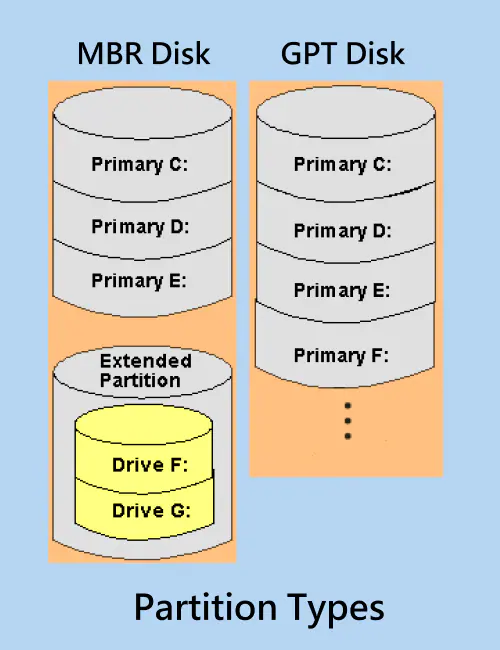
MBR Partitioning:
fdisk /dev/sda – Open fdisk for partitioning.p – Print the partition table.d – Delete a partition.n – Create a new partition.m – Display help.w – Save changes and exit.GPT Partitioning:
gdisk /dev/sda – Interactively create, modify, and delete GPT partitions.Choosing Between MBR and GPT:
parted /dev/sda – Use parted to manage MBR and GPT partitions.Associate a filesystem type with the partition.
mkfs.xfs /dev/sda1 – Format the partition (can be ext4, ext3, or any other).Mounting:
mkdir /mnt/rep1 – Create a directory for mounting.mount /dev/sda1 /mnt/rep1 – Temporarily mount the partition.nano /etc/fstab – Permanent mount (edit fstab)./dev/sda1 /mnt/sdc1 xfs defaults 0 0mount -a – Mount all filesystems in fstab.umount /dev/sdc1 – Unmount the partition.lsblk – Display partitions.mount – Show mounted filesystems and their types.df -h – Display disk space usage.Swap:
mkswap /dev/sda2 – Format as swap.blkid -p /dev/sda2 – Identify a partition.swapon /dev/sda2 – Activate swap (temporary).vim /etc/fstab – Edit fstab for permanent activation.UUID=<uuid> none swap defaults 0 0swapon -a – Activate all swaps.swapoff /dev/sda2 – Deactivate swap.free -mh – Verify swap activation.lsblk – Verify swap activation.Disk Cleanup:
nano /etc/fstab – Remove added lines in fstab.umount -a – Unmount all partitions.swapoff -a – Deactivate all swaps.fdisk /dev/sda – Delete all partitions on SDA.d – Delete partition.w – Save changes and exit.wipefs -a /dev/sda – Clean the disk.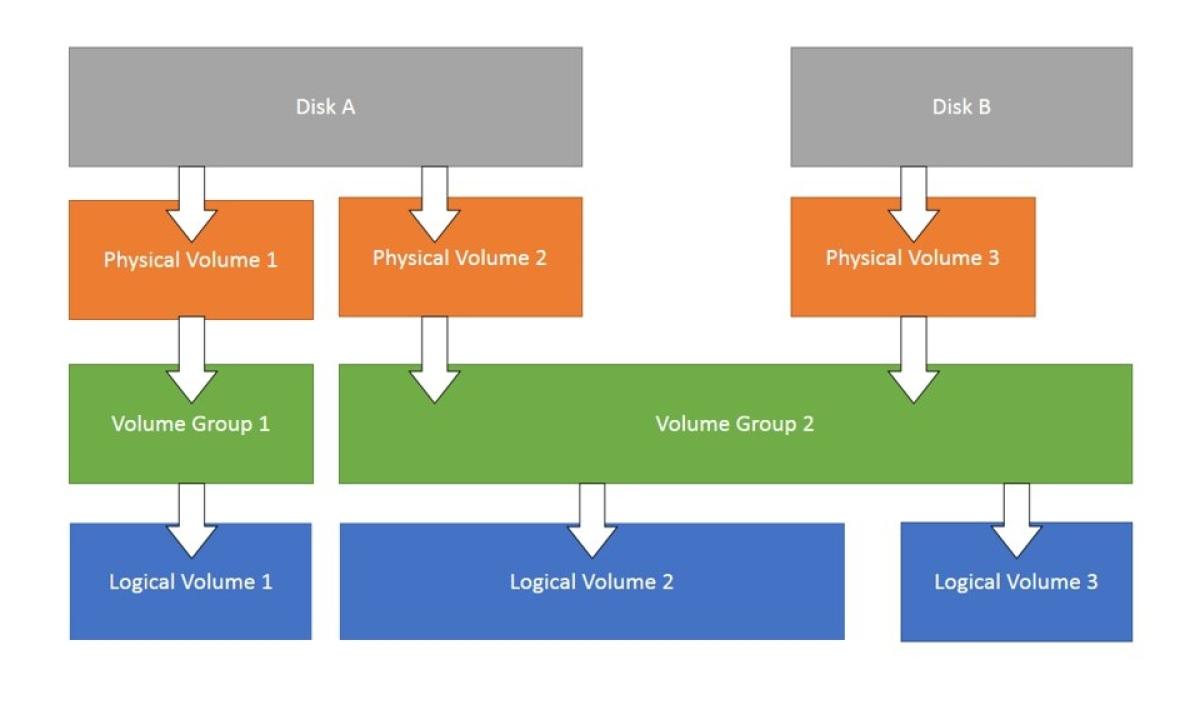
Installing LVM:
yum install lvm2 – Install the LVM2 package.Creating Partitions:
fdisk /dev/sda – Open fdisk for partitioning.n – Create a new partition.p – Choose primary partition.t – Change the partition type.8e or LVM for LVM type.w – Save changes and exit.Creating Physical Volumes (PV):
pvcreate /dev/sdb{1,2,3} – Create physical volumes on partitions.Creating Volume Group (VG):
vgcreate my_vgroupe /dev/sda /dev/sdb – Create a volume group.vgcreate -s 2M my_vgroupe /dev/sda /dev/sdb – Create a volume group with specified PE size.Creating Logical Volumes (LV):
lvcreate -L 5G -n my_lvolume my_vgroupe – Create a logical volume with specified size.lvcreate -l 60 -n my_lvolume my_vgroupe – Create a logical volume with specified extents.Creating Filesystem on Logical Volume:
mkfs.xfs /dev/my_vgroupe/my_lvolume – Format the logical volume with XFS filesystem.Mounting Filesystem:
vi /etc/fstab – Edit fstab for mounting.For each partition, the VG reduces a PE for metadata.
Physical Volumes:
pvscan – Scan all disks for physical volumes.pvdisplay – Display details of physical volumes.pvs – Display summary information of physical volumes.Volume Groups:
vgscan – Scan all disks for volume groups.vgdisplay – Display details of volume groups.vgdisplay my_vgroupe – Display details of a specific volume group.vgs – Display summary information of volume groups.Logical Volumes:
lvdisplay – Display details of logical volumes.lvscan – Scan for all logical volumes.lvs – Display summary information of logical volumes.Extend a VG:
vgextend my_vgroupe /dev/sdb7 – Extend a volume group with a new physical volume.Extend a LV:
Method 1:
lvextend -L +5G /dev/my_vgroupe/my_lvolume – Extend logical volume by size.xfs_growfs /dev/my_vgroupe/my_lvolume – Resize XFS filesystem (if using XFS).resize2fs /dev/my_vgroupe/my_lvolume – Resize ext2/ext3/ext4 filesystem (if using ext).Method 2:
lvextend -L +5G -r /dev/my_vgroupe/my_lvolume – Extend and resize logical volume.lvresize -r -L +50M /dev/my_vgroupe/my_lvolume – Resize logical volume and filesystem.Reduce a LV (only possible with ext4):
lvreduce -L -5G -r /dev/my_vgroupe/my_lvolume – Reduce logical volume and resize filesystem.Install Podman:
dnf install podman container-tools – Install Podman and related container tools.Create and Configure User:
useradd user1 – Add a new user.loginctl enable-linger user1 – Enable linger for the user to allow running services after logout.Inspect an Image:
podman inspect <id_image> | grep -i expose – Check the exposed ports of an image (useful for Apache).Inspect a Service:
journalctl | grep container-web.service – Check logs for the container service.Access a Running Container:
podman exec -it <container_id/name> bash – Enter the container's shell.Prepare Directory:
mkdir /local_path – Create a local directory for mounting.chown user1:user1 /local_path – Set ownership for the directory.Build and Run RSYSLOG Container:
ssh user1@localhost - Switch to user1.wget <path_dockerfile> – Download the Dockerfile.podman build -d ImageName . – Build the image (ensure you are in the Dockerfile directory).podman login registry.redhat.io – Log in to the Red Hat registry.podman search rsyslog – Search for RSYSLOG images.podman pull <url_image_searched> – Pull the RSYSLOG image.podman images – List images.podman run -d --name <container_name> -v /local_path:/container_path:Z <id_image> – Run the container with volume mount.Run RSYSLOG as a Service:
mkdir -p /home/user1/.config/systemd/user – Create systemd user directory.cd /home/user1/.config/systemd/user – Change to the systemd user directory.podman generate systemd --name container_name --files --new – Generate systemd service files for the container.vim container-rsyslog.service – Edit the service file to include Restart=always.systemctl --user daemon-reload – Reload systemd user services.systemctl --user enable --now container-rsyslog.service – Enable and start the service.systemctl --user status container-rsyslog.service – Check the service status.Pull and Run Apache Container:
ssh user1@localhost - Switch to user1.podman login registry.redhat.io – Log in to the Red Hat registry.podman search httpd – Search for HTTPD images.podman pull registry.access.redhat.com/ubi9/httpd-24 – Pull the Apache image.podman run -d --name <container_name> -p <user_port>:<container_port> -v /local_path:/container_path:Z <id_image> – Run Apache with port mapping and volume mount.Run Apache as a Service:
mkdir -p ~/.config/systemd/user && cd ~/.config/systemd/user – Create and change to the systemd user directory.podman ps – List running containers.podman generate systemd --name <container_name> --files --new – Generate systemd service files for the Apache container.systemctl --user daemon-reload – Reload systemd user services.systemctl --user enable --now container-<container_name>.service – Enable and start the Apache service.systemctl --user status container-web.service – Check the service status.Prepare PDF Converter:
useradd pod && passwd pod – Create and set password for user pod.mkdir -p /data/input /data/output – Create directories for input and output data.chown -R pod:pod /data – Set ownership for the /data directory.chmod -R 777 /data – Set permissions for the /data directory.echo "file" > /data/input/file.txt – Add a text file to the input directory.chown pod:pod /data/input/file.txt – Set ownership for the input file.Build and Run PDF Converter Container:
loginctl enable-linger pod – Enable linger for user pod.ssh pod@localhost – SSH into the pod user.wget https://raw.githubusercontent.com/sachinyadav3496/Text-To-PDF/master/pdf_converter.py – Download the PDF converter script.wget https://raw.githubusercontent.com/sachinyadav3496/Text-To-PDF/master/Dockerfile – Download the Dockerfile.podman build -t pdf . – Build the PDF converter image.podman run -d --name pdfconverter -v /data/input:/data/input:Z -v /data/output:/data/output:Z <image_id> – Run the PDF converter container with volume mounts.Run PDF Converter as a Service:
mkdir -p ~/.config/systemd/user – Create systemd user directory.cd ~/.config/systemd/user – Change to the systemd user directory.podman generate systemd --name pdfconverter --files --new – Generate systemd service files for the PDF converter.systemctl --user daemon-reload – Reload systemd user services.systemctl --user enable --now container-pdfconverter.service – Enable and start the PDF converter service.systemctl --user restart --now container-pdfconverter.service – Restart and start the PDF converter service.systemctl --user status container-pdfconverter.service – Check the service status.journalctl | grep container-pdfconverter.service – Check logs for the PDF converter service as root.vim /etc/yum.repos.d/BaseOs.repo[BaseOs]
name=BaseOs
baseurl=…/BaseOs
enabled=1
gpgcheck=1 # If there is a URL key, otherwise set to 0
gpgkey=… # Specify the key URL if providedvim /etc/yum.repos.d/AppStream.repo[AppStream]
name=AppStream
baseurl=…/AppStream
enabled=1
gpgcheck=1 # If there is a URL key, otherwise set to 0
gpgkey=… # Specify the key URL if providedyum repolist – List all enabled repositories.nmtui – Text user interface for network manager.Activate a connection > deactivate > activate – Mandatory steps after making changes to the connection.nmcli con sh – Check interface status, must be green.systemctl isolate multi-user.target – Switch to multi-user target.systemctl isolate graphical.target – Switch to graphical target (used at the start of the exam).loadkeys fr – Load French keyboard layout.systemctl get-default – Show the default target.dnf install tuned – Install the tuned package.systemctl enable --now tuned – Enable and start the tuned service.tuned-adm recommend – Check the recommended profile.tuned-adm active – Show the active profile.tuned-adm list – List all available profiles.tuned-adm profile <profile> – Change to a specified profile.systemctl restart tuned – Restart the tuned service (mandatory after changes).